|
||||
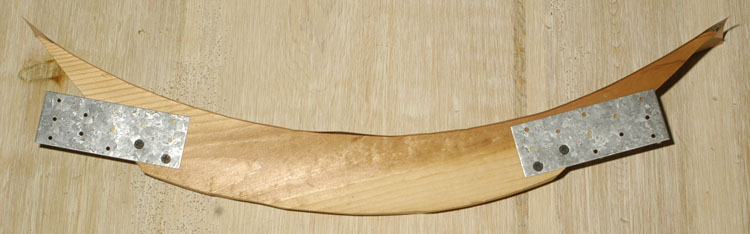
My first cubicle train was in HO. This was mainly because it was easy to see how I would implement it in HO. The thought to consider whether cubicle walls could support G-scale just never entered my mind. The only problem I had with the HO cubicle train was that it occasionally took a trip to the floor as people leaned on or bumped into the front wall of my cubicle. As you have probably noticed, the front wall is usually a bit flimsy. So I suggest that when you do an HO cubicle train that you do not run the train across your front wall. Just make the track into a "U-shape" as shown below. Otherwise, figure on your train hitting the floor about twice a year or so. Expect the engine to be totaled about once a year. The Track The track was simple. I used Kato Unitrack. This provided a good sub roadbed to adhere to the top of the cubicle wall. Also, Unitrack has interlocking tabs that holds the track together. Kato makes the little bumper section you see above as well has half-length pieces. I don't know if it was luck or what, but by using regular Unitrack pieces and the half-length pieces, I was able to get a track plan that fit perfectly on the cubicle wall without having to cut and make any special lengths. The Unitrack is attached to the top of the cubicle wall using two pieces of double-faced foam tape. You need two pieces at each location because the Unitrack is hollow on the bottom. The Bridges The resulting bridges turned out to be very simple, but it took a lot of thought to get there. Due to the sharp curve, any through type bridge would have to be very wide. So a deck type of bridge was in order. This allowed me to make a strong, curved bridge. I didn't want anything expensive and delicate; especially not delicate. So I thought up a curved bridge made from a piece of 1x8. See photo below. The top of the wood needs to be flush with the top part of the cubicle walls. So I mounted two nail plates to the wood and literally hang the bridge between the cubicle walls.
The bridge was faced with pieces of stone paper. I think Faller makes it. The bridge couldn't be simpler or cheaper! You may think this bridge is ugly, but on top of a cubicle wall, nobody can see it. There is simply no point in detailing any aspect to the top of the bridge. Wiring it up.
You will need to gap the track at two locations. On the section where the locomotive is going forward, you gap behind the rear driver wheel. On the section where the locomotive is backing up, you gap behind the front driver - which includes the length of the whole train. Set these diodes up for the longest train you intend to run. Use 1N4001 diodes, Radio Shack 276-1101. If you have any doubts about your ability to get the diodes in the right orientation, just try your train without the diodes. After you run the train into the isolation block, reverse the track power. Bridge the gap in the track with a diode. If your train backs up, you have it right. Solder the diode on. If the train doesn't back up, you have the diode wrong. My diagram above also shows how to wire in my timer circuit. If you buy the LGB or Aristocraft circuit, follow their directions. I believe their controllers will work just fine in HO. I put the timer and everything in one of my overhead cabinets. They are open in the back so running wires and a power cord in and out is easy. Enjoy!
|
Copyright by Allan Gartner 2007 © All rights reserved. You may print this for your own, personal, non-commercial use. Non-commercial, non-personal reproduction may be requested by visiting www.WiringForDCC.com/writeme.htm . All users, commercial and non-commercial, may link only to this site at www.WiringForDCC.com. Thanks to all who contribute to this site and the Q&A forum! |