|
||||
Decoder Installation into the
The Sumpter Valley pulled "Beer Express" makes it's rounds on my Finchfield & Wrensylvania Both of these locomotives feature good sound systems. These LGB locomotives with sound make for a very easy installation. The LGB motors in these units are already isolated from the power pick ups. By running the LGB electronics on the motor output of the decoder, this is a simple, four wire installation. Having the decoder control the headlights and the cab light is only a few more minutes of work. The LGB electronics, including the lights, sounds, and flickering firebox all work at extremely low throttle settings (about 3-5 on a Digitrax throttle of 0 - 99) so you do not need to worry about having to give the locomotive a lot of throttle before everything starts working. At such low throttle settings the locomotive is barely moving. So running everything off the motor output of a decoder works extremely well. You cannot have individual control over the various sounds like you could with Soundtraxx. LGB simply has not provided for this capability. You could gain control of these functions to some degree by connecting into the track reed switch sensors for the bell and whistle. With a backyard full of people, I have found I prefer the track reed switch triggers and not use throttle controls. I'm too busy answering questions of my guests. Therefore, I do not cover connecting into the reed switches. These instructions apply to the Unitah and Sumpter Valley that have the built-in sound. I suspect that the wiring for the motor and track power pick up apply to the units that do not have the built in sound, but I cannot guarantee that. Likewise, I cannot comment on what the non-sound units have in the way of chuff sync or triggers for the bell and whisle. Where I show you to tap into the LGB locomotive also applies to non-DCC command control systems. This installation note assumes you have read the section on Wiring Specific Locomotives.
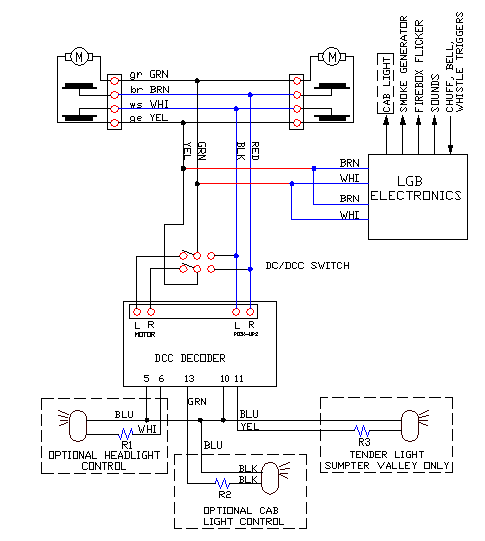
Decoder Selection I used a Digitrax DG583S in my Sumpter Valley. It is a 5 amp decoder. I used a Zimo MX65S with back emf control in my Unitah. It is a 3 amp decoder. You should be able use a 3 or better decoder from any manufacturer. The colors of the wires that come out of the decoder are the NMRA standard colors. The pin numbers are for the Zimo decoder. Note, I do not show the wires going to the ribbon cable connector on the drawing. I did this simply because things would be too cramped making the drawing too difficult to read.
Openning the Locomotives The Sumpter Valley is a real project to figure out how to open. It was also a real project to figure out how to close it back up. I highly recommend you video tape the disassembly! After taking several hours to put it back together, I went out and bought the cheapest camcorder I could get. I was never going to spend so much time again trying to get something back together. The Unitah was a lot easier to figure out and I didn't have to disassemble it as much to get into it. However, screwing back together is the usual fun that seriously makes you wonder if it wasn't designed to be difficult to reassemble on purpose. I always love shaking $1500-2000 around trying to get the screw that fell inside of it out. I can't offer you good advice about Sumpter Valley, but here are the screws you will need to remove to open the Unitah.
Wiring the Locomotive Wiring the locomotives is easy to do. This includes screwing up! So pay close attention to what I am about to say, the wiring diagram below, and particularly close attention to what you are doing. First I will describe what you will do and why making a mistake is easy. You are going to do two things. 1. You will pick up power from the wheels, go through the decoder, and power the motor. So good, so far. 2. You will connect the input of the LGB electronics to the output of the DCC decoder. Furthermore, after you cut the wires between the electronics and the trucks, you will now have several sets of wires with the same color codes. As if that wasn't enough, look carefully at the drawing below. The input of the LGB electronics and the power pick-ups have the same colors - brown and white - as you would expect of the locomotive as delivered from the factory. But in connecting both the motor and the LGB power inputs to the DCC decoder output, you will now have the green and yellow wires from the motor connecting to the brown and white of the electronics. Starting to sound like trouble? It's plain as can be where the wires are going to and where they are coming from. But if you are not consciencously always thinking "I need the wire from..." or "the wire to...", Murphy's Law states that in a moment of inattention, you will solder the wrong wires together. Now that you've been warned, be careful to pay attention to my diagram and think about what you are doing. You shouldn't have any trouble. If you are careful to follow my diagram, you will have a locomotive that will roll forward when you issue a forward command. Furthermore, if you leave the headlight powered from the LGB electronics, the headlight will come on when the locomotive is moving forward. If you want, you can stop now and put the locomotive back together. The only drawback to stopping now is that the headlight and cab light will be out when the locomotive is stopped. If you run the headlight and cab light from the DCC decoder, you can keep these lights on when the locomotive is stopped. Go ahead and take a few more minutes and connect the headlight and cab light to your DCC decoder. The resistors R1, R2, and R3, all need to be 1/2 watt resistors. I use 390 ohm resistors on my track that has 18V on it. If you are running 20V or higher on the track, you should use 470 ohm resistors. If you are running 18V, you could drop down to 330 ohms if you want a brighter light. The color of the wires I show coming from the decoder, are the NMRA standard colors for decoders. A DCC decoder from any manufacturer can be used. Just be sure it is a 3 amp or higher decoder. I have drawn a Zimo decoder which does not have NMRA colored wires. So for the motor and power pick up, I have shown the screw terminal block that the Zimo MX65S has. The wires shown with the numbers are the numbers of the wires on the ribbon cable connector that the Zimo has. With the cab light wired to ribbon cable wire #13, function F3 on your throttle will operate your cab light.
Note also that your smoke generator is also operating on the output of your DCC throttle. Yes, everything works fine! Do not try to rewire your smoke generator directly to the power pick-ups. There is a 5V voltage regulator somewhere on the LGB electronics. Connecting the smoke generator to the track will instantly smoke your smoke generator into oblivion! It is possible to design a simple circuit that would provide the 5V to run the smoke generator all the time, including when the locomotive is stationary. I won't bother doing this unless someone writes me that they want this. About the only thing you loose with this conversion, is the power the LGB locomotives can provide to cars following it. Again, I could design this back in, but I have no need for this capability so I didn't bother. If you need it, let me know.
|
Copyright by Allan Gartner 1996 - 2006 © All rights reserved. You may print this for your own, personal, non-commercial use. Non-commercial, non-personal reproduction may be requested by visiting www.WiringForDCC.com/writeme.htm . All users, commercial and non-commercial, may link only to this site at www.WiringForDCC.com. Thanks to all who contribute to this site and the Q&A forum! |