Athearn PA-1 A & B Units
With Mars Light
This installation is a good first installation.
These directions
probably can be used for most Athearn "Covered Wagons."

DECODER USED: Digitrax DH83FX - 2 amp decoder with long addressing
and Mars Light capability.
I wish they were all locomotives, diesel or steam, were
this easy. Diesels
are notorious for not having any room to put in a decoder. This
covered wagon, with space to either side of the motor, makes it easy. You
will glue the decoder to the side of the motor with some Liquid Nails
or Walther's Goo when you are all done.
Remove the headlight and the strip that runs to the front and back
power pick ups that is on top of the motor. You won't need either
of these to finish the installation.
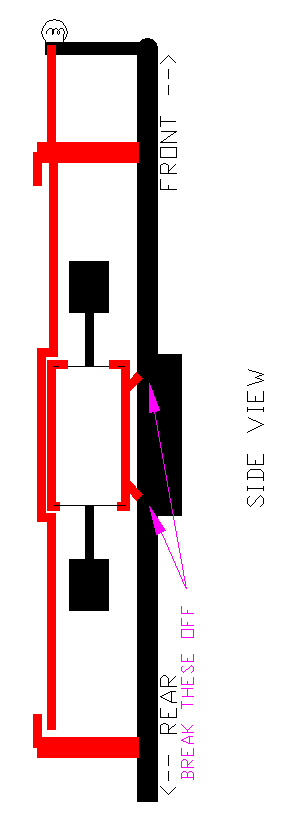
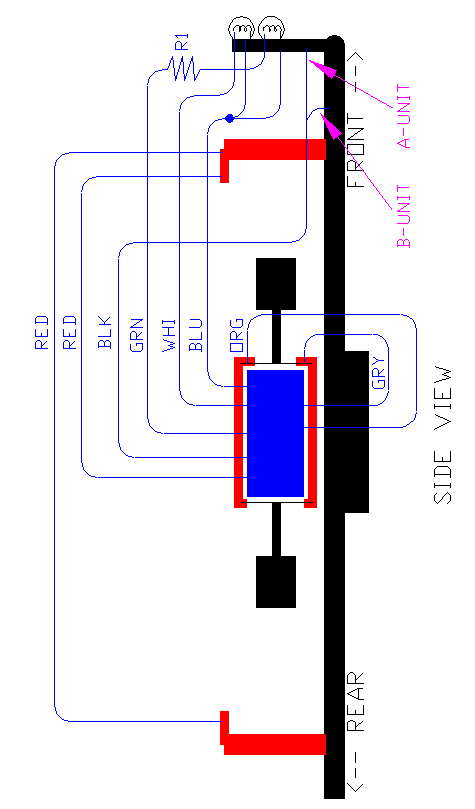
Athearn PA-1 A&B Units original "wiring."
Obviously, the B-Unit does not have a head light!
Pop the motor free. It is held in place by a rubber mount. Just
rock it while pulling straight up on it. Make sure you know it's
mounting orientation. Here's a little picture to help you.
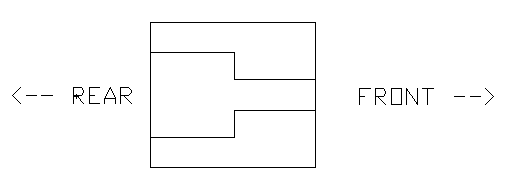
Athearn PA-1 A&B Units - Top View of Motor Mount.
Break the little tabs off the bottom of the motor mount. This
is extremely important. A DCC locomotive must have
the motor isolated from the frame. Now cut some pieces of electrical
tape and cover the bottom of the frame under the motor so that there
is no way the motor can ever electrically touch the frame.
Athearn PA-1 A&B Units After Installation.
I said this was the easiest installation yet, but I didn't say there
wouldn't be a few small challenges. Pop the strip off the top
of the motor and solder the orange motor lead to it. DO
NOT try to solder the wire to strip while on the motor. I
almost ruined the motor frame. It can't take any heat. The
strip is easy to pop off and put back on. Underneath it is a
spring. If you are prepared, it won't get away. It's not
a very strong spring. When done, snap it back on.
Attach the gray wire to the strip under the motor the same way.
Here's another small challenge: Attaching the black wire.

Attaching the black wire on the A-Unit:
First, sand a spot on the front of the headlight mount until it shines. Now
solder the black wire to it. You will need a gun type soldering
iron of at least 100W.
If you have a resistance soldering station, here is an opportunity
to show off. Clamp the wire with a hemostat to the headlight
mount. Zap it with the resistance soldering iron and you're done
in three seconds! See the section
on Soldering for more on using a resistance soldering station.
Attaching the black wire on the B-Unit:
Obviously, no headlight mount. What to do, what to do! On
the side frame is a thin spot that is recessed a bit from the widest
point on the frame. I drilled a small hole through this thin
spot. Then I used a self-tapping #2 pan head (slightly rounded)
screw. Tin the wire and wrap it around the screw before you have
it screwed all the way down. When done, you will have no trouble
putting the body back on.
I don't know what metal that frame is made from, but it is remarkably
hard to drill through. Be careful when you finally penetrate
the frame that you don't penetrate the front truck as well!
Resume both assemblies here:
If you are doing the B-Unit, you are almost done!
In either case, sand the front power pick up tab until it shines. Solder
the red wire to it. If you have a resistance soldering iron,
here is your chance to show off again.
Now take another piece of red wire and solder the rear power pick
up to the front power pick up.
If you are doing the B-Unit, you are done! Glue the decoder
to the side of the motor. Use some rubber bands to hold it on. Let
it dry at least a day, preferably two.
Clip the ends of the other wires off so that they cannot ever short
together. I didn't want to cut them off, so I looped them up
and stuck them into a piece of heat shrink tubing and glued it to the
other side of the motor.
Installing the headlight and mars light:
Toss the light bulb that came with the locomotive. It is easier
to simply use a grain of wheat bulb than to fool with the stock headlight.
Connect one end of the grain of wheat bulb to the white wire.
Connect the other end of the grain of wheat bulb, plus an end from
a second bulb, the mars light, to the blue wire.
Solder a 22 ohm, 1/4 watt or bigger resistor (R1), to the green wire. Slide
a piece of heat shrink tubing over it. Attach the other end of
the mars light to the loose end of the resistor, solder, and shrink
the tubing. For a little more on mars lights, see the section Using
Minature Lamps.
|
Radio Shack
|
271-1103
|
22 ohm, 5%, 1/2 W resistor
|
I'm good with wiring, but I'm open to better ways to mount these
two lights. Both will fit through the square hole in the original
headlight mount. I slid a piece of tubing over the mars light
and pushed the bulb forward. I then attached the mars light to
the underside of the mars light. I won't tell you how in hopes
that you will come up with a good way.
The plastic headlight bezel easily pops out of the body. With
wire cutters, cut it into two pieces. Trim the connecting plastic
further to increase the gap and decrease the light coupling when reassembled. Blacken
the edges if you like. They will both snap in and stay when you
are done. And by the way, you are done!
|
CV
|
Value
|
Function
|
|
51
|
02
|
Mars light, forward, on with F1
|
|
62
|
|
Mars rate and keep alive brightness. Try it at it's default value. Then
read manual and tweak to suit your preference.
|
The decoder installation was easy, but putting on the Kadee coupler
is not any fun. I'm going back to my steam locomotives. Enjoy
your new toy!
